

In Brief: How To Replace The Pull Cord On A Troy Bilt Snow Blower
To replace the pull cord on a Troy Bilt snow blower, firstly remove the safety ignition key. Remove the chute, detach the spark plug harness, primer line, and fuel line. Remove the housing, then remove the starter housing. Tension the recoil starter, feed the new cord through and wind it on. Reassemble, then test it before use.
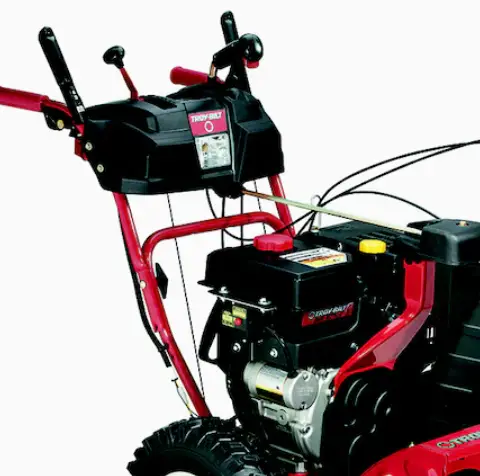
Thankfully, replacing the cord yourself is a simple process that anyone can do.
We have put together this step-by-step guide to help you replace the pull cord on your Troy Bilt snowblower.
How To Replace The Pull Cord On A Troy Bilt Snow Blower
We have put together this step-by-step guide to help you replace the pull cord on your Troy Bilt snowblower.
Tools
- Basic toolset
Instructions
- Step 1: Remove Safety Ignition Key
Before doing any repairs or maintenance on your Troy Bilt snow blower, you should always remove the safety ignition key. Keep it somewhere safe. - Step 2: Remove The Chute
Unscrew the bolts securing the chute to the machine housing. Remove the chute and place it to one side. - Step 3: Detach The Spark Plug Wire Harness
Under the safety ignition key slot, you will find an attached wire caddy. Release it by pressing the tab and pulling it out. - Step 4: Detach Primer Line
Locate the primer bulb and pull off the connected rubber tube. - Step 5: Detach The Fuel Line
Locate the fuel line running from the fuel tank to the engine. Clamp the line, then release the connected metal clamp and pull the line off the engine. Beware of fuel spillage. - Step 6: Remove The Housing
To remove the housing, locate the screws that hold it in place. Where they are located depends on the model, but they should be easy enough to find. Once you have removed the screws, lift the housing and fuel tank off the machine and place them aside. - Step 7: Remove The Starter and Blower Housing
Remove the bolts holding the starter and blower housing to the frame. Loosen the guide loop that holds the starter handle in place using the thumbscrew. If you are installing a new housing with a pull cord already tensioned, you can skip to Step 11. If you are just replacing the pull cord, move on to the next step. - Step 8: Remove Old Pull Cord
To remove the old pull cord, cut the end of the cord to remove the knot that holds it within the starter housing, then pull it through the handle and discard it. - Step 9: Wind the Recoil Starter
Next, grab a screwdriver and keep it close. Wind the recoil starter, within the starter housing, counter-clockwise around 6 or 7 times until you feel resistance. Then, wind it back so that the hole in the recoil starter lines up with the hole in the housing.
Insert the screwdriver through both holes to keep it in place. - Step 10: Wind the Cord
Grab your new pull cord and knot it at one end. Feed it through the handle. Hold the recoil wheel in place with one hand and remove the screwdriver if necessary. Feed the cord through the two holes, then knot the end.
Release the recoil wheel and allow the cord to wind around it. Do this slowly to ensure the cord does not twist.
To see this process in action, including a method for if you do not have a screwdriver handy, check out this video: https://youtu.be/NQRszIkdZt0 - Step 11: Reattach Starter and Blower Housing
First, run the cord through the guide loop and tighten it with the thumbscrew. This will hold the handle in place.
Run the housing down to its attachment point and bolt it back into place. - Step 12: Reattach The Housing
You can now reassemble your snow blower. Start by replacing the housing and securing the screws that you removed earlier. - Step 13: Replace the Fuel Line
Reattach the fuel line running from the gas tank to the carburetor. Tighten the spring clamp you removed earlier, then remove the clamp that you attached to the fuel line. - Step 14: Reattach Primer Line
Push the rubber tube you removed from the primer bulb back onto its connection point. - Step 15: Reattach the Spark Plug Wire Caddy
Under the safety ignition key slot, reattach the wire caddy and ensure the tab clicks into place. - Step 16: Reattach the Chute
Line up the chute with the alignment tabs, then secure the screws you removed earlier. - Step 17: Insert Safety Ignition Key
Finally, you can reinsert the safety ignition key back into its slot. You are now free to use your snow blower.
Summary
We hope this guide has helped you to replace the pull cord on your Troy Bilt snowblower.
Pull cords are a common point of failure, so learning to fix it yourself will save you money over the life of the machine.
If you have any questions or comments about this guide or snow blower repairs in general, please feel free to leave them in the comments section below.